... A tutorial!
It's been a while, huh?

I love giving my kids homemade gifts, and decided to make some Menus for Bug {E’s} Restaurant – the kid loves to ‘cook’ all day in her kitchen.
Supplies:
2 fat quarters – one each for front and back
Inkjet Printable Fabric sheet
Lightweight fusible interfacingMedium weight fusible interfacing
Basic sewing supplies - thread, machine, rotary cutter, ruler & mat, etc.
I made my menu template in Microsoft Word. I fit four to a page. Once you are happy with the layout, print on regular paper… just to make sure you really like it. You should allow at least 3/8” on each side for seam allowance. If it looks okay, print on printable fabric sheet according to package directions.

Peel backing paper away and trim to size. Mine were just about 4” x 5”.


Using a crochet hook, poke corners out to lay flat. Topstitch around edge at 1/8”. To further reinforce the interfacing, I also did a quick “stitch in the ditch” around the menu.


Using her tutorial and two pieces of fabric measuring 8x20” (again with lightweight fusible interfacing on one fabric to make it a little sturdier) I made a great little pouch to put her menus away at the end of the day.

Finally, wrap and make a little girl you know very very happy on her birthday! How fun would this be given along with some felt food?


 Fold with right sides together and sew long side together.
  Turn inside out...
 and have one happy {and compliant} girl!
 Cute, no? So, inspired by this top, I came up with this:
  Here's how I did it.
  Unfold it and cut one arm off at a slope, like so:
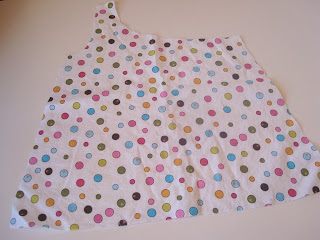 Cut a second piece and sew them right sides together along the side seams.
 On the left side of the shirt (it will have the strap) use your bias tape to finish the armhole.
 Serge the edge of the 2 1/2" strip, then fold it over and sew at 1/4" .
 I used my ruffling foot, but use whatever method you like. With right side of solid to wrong side of main fabric inside the neck hole, sew together, ruffling the solid fabric.
  Serge seam together when you get back to starting point.
 It will now look something like this:
 Pin ruffle down (as a side note, this is where I realized I picked the wrong pink. Bummer. Live and learn...).
 To make a casing for the elastic, I found my smallest safety pin and it would fir through a 1/4" seam, so that is the size of my seam. Topstitch all the way around, leaving a 1" opening for threading elastic through.
  Measure the top of the garment, mine is about 26" around, and I opted to make my elastic at 75% of this measurement, so 19".
 Thread through opening.
  Sew elastic together - my machine likes to have fabric to hold on to, so I sew them together on top of a scrap then trim the excess. Topstitch opening.
 Serge bottom edge and fold towards inside to hem at 1/4".
  Done!
Done! For the baby, I opted to add another strap - I simply serged both sides of a 2" piece of fabric, topstitch the serging to the inside. With the tank on the toddler, I figured out where the strap should go and topstitched along the elastic casing line.
  Happy toddler and happy mom!

 I cut 12 1/2" for a 3t, and 11" for a 2t.The original hem is what I used for the bottom hem, so that's done already.
 Turn the top over to wrong side of fabric by 1/4" and stitch.
 Fold over again by 2 1/4", pin and sew again using your original seam as a guide.
 Take a seam ripper and take off original belt loops. Mine were big enough I cut them in half and was able to use the five originals between the two skirts.
  After I stitched the belt loops in place, there was about 3/4" that I had to put a belt through. This will just depend on what size your loops are. For mine, I cut a piece 2 1/2" x 34". Iron in half, with both short ends ironed in. Fold both long sides towards the center, and iron again.
 Stitch close to the edge of your belt. I used a contrasting thread and love how it looks. Thread it through the loops and enjoy!
 The girls were unusually cooperative for the photo shoot today.
 It went a lot better than
  So cute! I want to make another one with pleats as well as the belt for a fuller look at the bottom.